We learned how to create railings in Revit model. Now we will work on different view type in this tutorial.
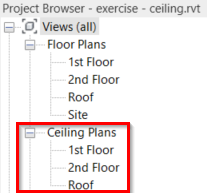
If you’ve noticed, in Revit Views we have several views groups. Until now, the floor plans are the most views we use. But below floor plans, there is another plan view group: ceiling plans. We use this view in this tutorial. We covered how to access Revit views in view navigation tutorial here.
You are already familiar with the concept of ceiling plans, aren’t you? Imagine we are actually inside a room. When you see below, you will see the floor plan. And if you see above you, you will see the ceiling plan. There are some objects you only see in these plans. And so the other way: some ceiling hosted objects can’t be seen on your floor plan.
Now open your 2nd floor ceiling plan.
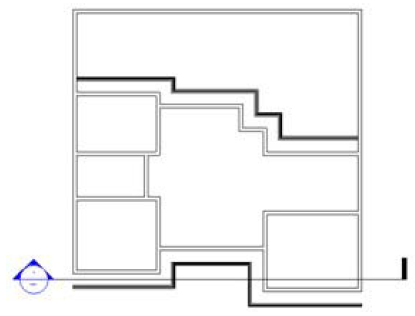
You will see our roof fascia appear in this view. It was placed above the 2nd floor, so we can see it. But we don’t need roof fascia to appear in this plan. Select the roof fascia. Now hide it by click hide>elements from your contextual ribbon.

Hiding this roof fascia will hide it not only for viewing. But will also disappear when you plot it. Now activate the ceiling tool.

Move your pointer to your plan. You should see now Revit is trying to find rooms and highlight it. Move your pointer where you want to place it. Click your mouse.

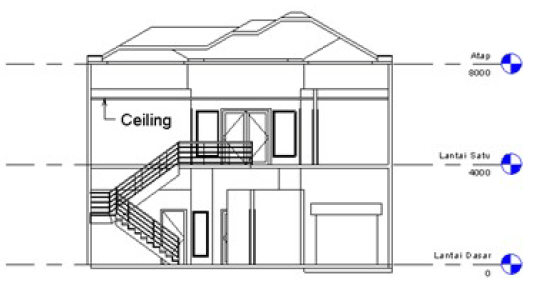
Place ceilings to all rooms on the 2nd floor. After you finish, make a section to review our model.
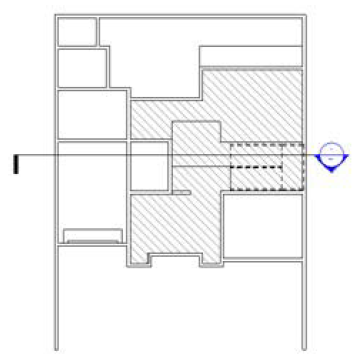
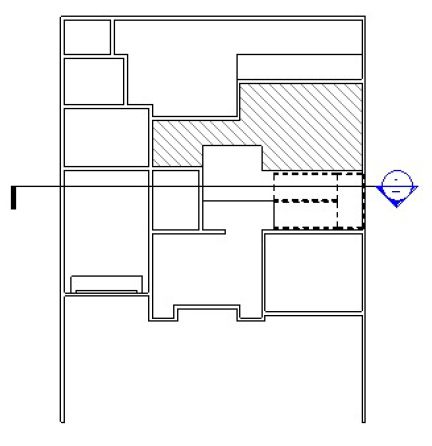
Now let’s move to the 1st floor-ceiling plan. 1st floor requires more work. We have a void and a stair. We are going to define the ceiling in this area by sketching it. First, place ceilings in every room in this plan, except for the hatched area below.
After you finish, activate place ceiling. Find sketch tool on your ribbon.

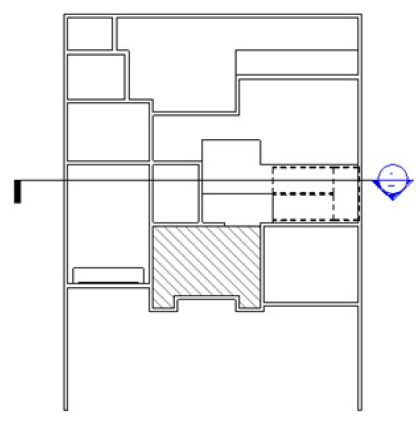
Sketching here is just the same as creating a floor. Sketch it as a closed polygon, and click finish. That’s it :) Create a sketch for like below.
And after you finish with that railing, continue finishing the 1st-floor ceiling by creating another one like below.
Next, we will discuss creating ceiling edges, to close the gap between the 2nd-floor slab and the 1st-floor ceiling.
*You can purchase this Revit tutorial compilation in an e-book. Find out the books in our E-Store .


please how can i make p. of p on revit 14 ceilings and widows.
Hi Edwin! I’ve been trying to create parapet on top of my wall so I could create the roof on on top of the parapet, but I could not find the parapet icon anywhere in revit. I’m using revit architecture 2012 version.
Also, I need to add moldings to my windows edges to make it attractive but I have no idea. Can you help?
Lastly, how do I change the paint colour of the walls?
Nicholas,
There is no parapet tool in Revit. You can define a wall that has parapet or create a custom parapet using wall sweep or in-place component. Maybe these tutorials can give you some ideas:
https://www.youtube.com/watch?v=xRu36tfB_zo
https://www.youtube.com/watch?v=BkJl3bsvvMM
Hello Edwin,
I have the student version of Revit 2013 and when I go to make the ceiling plan, I cannot select the sketch mode and there are no drawing tools.
Can you help me ?
Are you using Windows 8.1. or Windows 7 with .NET 4.5 installed? Try to install the latest update: http://knowledge.autodesk.com/support/revit-products/downloads/caas/downloads/content/revit-architecture-2013-update-release-3.html
Hello Edwin,
Thanks for your reply. I tried to run the update but it says that it can’t find the Revit software on my computer and then I can only press ‘okay’ and the update box closes.
What type of Revit do you have? Revit Architecture, Structure, MEP or Revit? You need to install specific update for each type. Try to search it in http://knowledge.autodesk.com/
Hello Edwin,
I have Revit 2013, it isn’t Architecture or Structure, just Revit 2013 but it is the student version, does that make a difference?
Wayland
The student version should be the same with commercial version. But you need to install the correct update for your Revit program.
Thanks a lot Edwin, it worked! I realised that I had installed the download for Revit Architecture not Revit, and that’s why it wasn’t working.
Thanks!
thanks Edwin, its works.
Edwin, thanks for the tutorial.
Current I can not selecting the ceiling that I created using automatic ceiling command. When I try to select the edge its only highlight the walls below.
I do not have problem when I'm selecting the sketch ceiling.
Thanks.
Have you tried to press tab to cycle between overlapping objects? You can also select it from other view (usually section works best) then go back to ceiling plan view for further modification.
Hello there
I have been reading the post. I have a problem with my revit. I wonder if you could help me with it.
I have been using revit 2010 to create a city hall project. Now that I have finished the Floor Plans and roof I can't find the Ceiling Plan where it should be. I wanted to know if I have to activate it or something.
Mahdi,
You can create a ceiling plan from your ribbon> view tab> create panel.
Click plan views> reflected ceiling plan.
HTH
very nice and useful blogs. Keep writing more. pls post practical model construction technique using Revit Articulture.
Thank you Susan :)I'm glad you like this blog. Encourage me to keep writing.
Thank you Susan :)I'm glad you like this blog. Encourage me to keep writing.