This is the first article of my AutoCAD tutorial series. Since I have Revit and MicroStation tutorial for beginners, then I think, why not writing AutoCAD for beginners too? I know that there are many resources for learning AutoCAD, but I hope this is still useful.
I have posted 12 steps you need to get through to mastering AutoCAD. This AutoCAD tutorial will be based on that article.
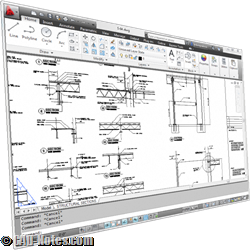
The AutoCAD Interface
Let’s start your AutoCAD and get familiar with the AutoCAD interface elements, what they do, and where you can access them. You can see an image at the bottom of this post. You can see where are the interface elements by clicking the next/previous button on the image. If you can’t see the image, you need to install flash player for your browser.
Changing the Workspace
Before we start, I want to make sure we all see the same AutoCAD interface, so if you don’t see the same interface as we see in this image, click the workspace button in your AutoCAD, then select the ‘2D Drafting and Annotation’. Click next button to see how to do it.
AutoCAD Interface Elements
- Your AutoCAD drawing area. This is where you will drawing your AutoCAD objects.
- AutoCAD Ribbon. This is where you can access AutoCAD tools and settings.
- AutoCAD Ribbon has several tabs. Each tab holds AutoCAD tools based on your drawing task. For example, we can use drawing tools and modify tools in home tab. But when we need to add text and dimensions, we need to open the Annotate tab. When we need to insert blocks, we need to move to insert tab.
- In each tab have several panels. This panels have similar AutoCAD tools inside them.
- Command Line. We can activate tools and change the tool settings by typing in command line. Command line is also providing information what you should do next.
- Drafting Settings. While we draw, we need to change some drafting settings. This is where you can change it.
- The AutoCAD logo. Click it once (do not click it twice, as doing it will end your AutoCAD session).
- AutoCAD will show you the AutoCAD menu. Some will say ‘application menu’, since the application name is AutoCAD, I prefer to call it AutoCAD menu :) This is where you can access tools related to applications, such as saving files.
You will see more interface elements as we move forward.


very helpful…instructions are very clear….looking forward for another article about AUTO CAD commands…
sir, i wand to autocad introduction class notes please forward to my email id
does auto cad include things to do with architecture about construction of buildings
I want autocad. kindly send me the pdf format via my email sunday2jimmy@yahoo.com. Thanks
I want to learn AutoCAD please assist me because I am slow learner.what can I do to make it work.
firstly u learn the basic co-ordinate system of auto cad it will make u easier to learn the cad.
sir idk what is workspace button
The workspace button is the gear icon located at the bottom right corner of your screen. It is used to switch between workspaces, eg 2D and Annotation and 3D Modeling environments.
Get over 200 exercises to practice AutoCAD here: https://gumroad.com/novafel
Thank you. This are really helpful
am really interested to learn Auto Cad. Is it possible to avail to me learning guides/ tutorials in pdf format if possible. my e-address is ameen7935@hotmail.com
Plz explain about autocad wait for u Edwin